Archive for the 'history dish mondays' Category

History Dish: Lima Beans and Bacon with Marshmallows

limas5
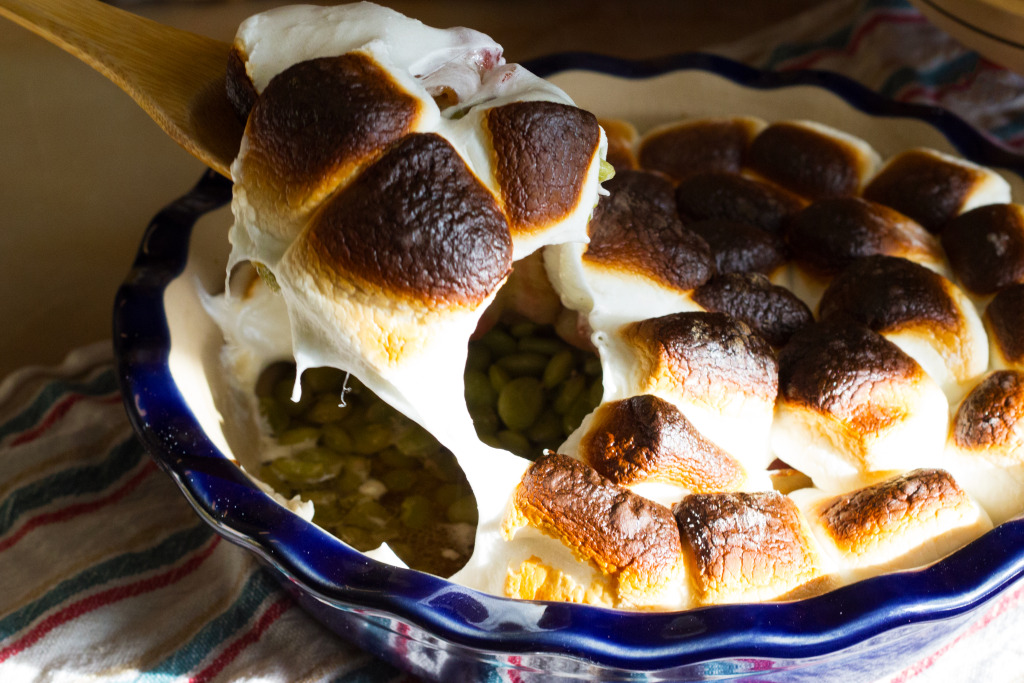
Lima beans, bacon and marshmallow casserole. Photo by Jess Tsang.

Coming to a holiday table near you: Lima bean and bacon casserole, topped with marshmallows! Ok…maybe not. This recipe comes from a handwritten booklet my Mom sent me. She said she “took a chance!” and bought it on Ebay, and when I flipped through the thin and faded notebook, this recipe caught my eye for obvious reasons. With such an odd combination of ingredients, I had to give it a shot.

The History

limas1
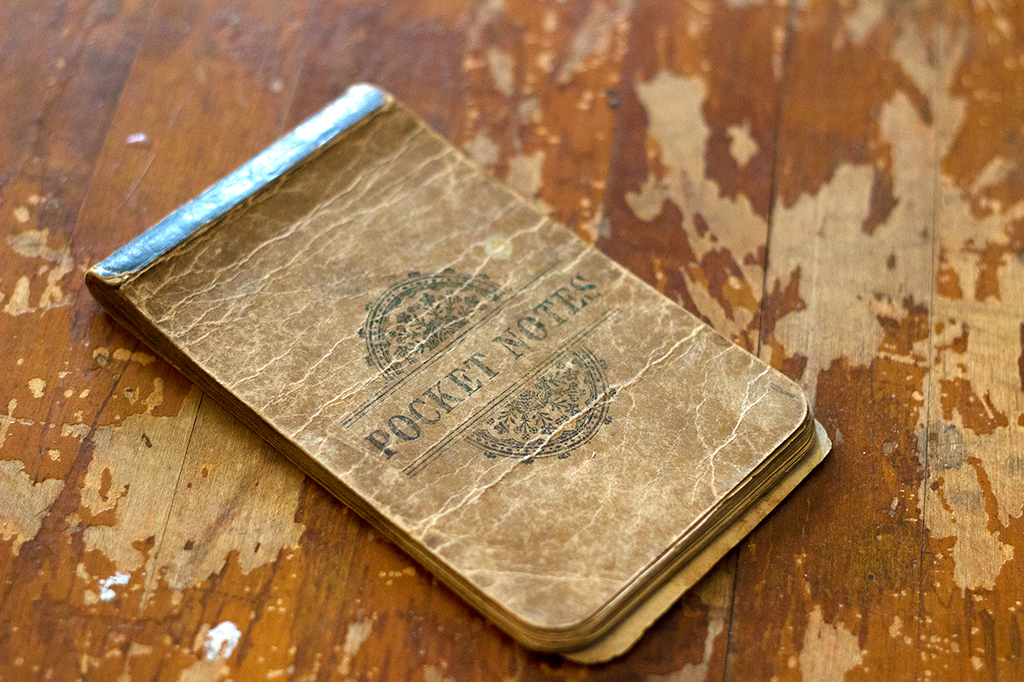
The handwritten recipe booklet that contains the recipe. Photo by Jess Tsang.

The notebook isn’t dated, it simply contains pages of recipes jotted down for safe keeping, including Ham Rolls and a ground beef dish called Hiker’s Hastener. Sometimes, a unique recipe like Limas with Marshmallows can help date a recipe book like this one. After searching Google Books, I discovered the recipe had been potentially been copied out of A Book of Practical Recipes for the Housewife, published in 1900.

One of the reasons this recipe caught my attention is because last Thanksgiving I looked into the history of Sweet Potato Casserole with Marshmallows. Marshmallows became a popular convenience food at the turn of the 20th century because new machines were invented that produced them cheaply and easily. Previously a delicate confection, marshmallows were now available for the masses. Recipe books pushed housewives to use them as substitutes for more labor intensive toppings like meringue and whipped cream.

The frist recipe for sweet potatoes topped with marshmallows appeared in 1917 or 1918 (read more here). But this recipe for lima beans topped with marshmallows appeared in 1900, which means there was a precedent for topping vegetables with marshmallows before they were plopped on sweet potatoes.

Are there other recipes for vegetables topped with marshmallows? Broccoli? Brussel sprouts? I’m not sure. I haven’t found them yet. But clearly this was a thing

The Recipe

limas2
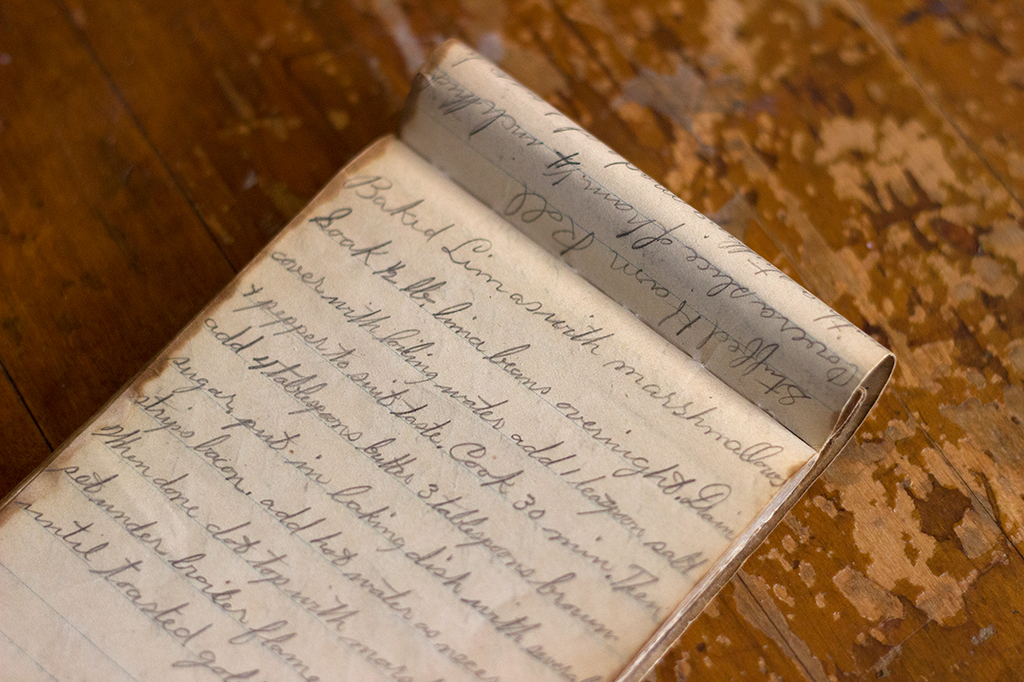
Baked Limas with Marshmallows, c. 1900. Photo by Jess Tsang.

limas6

The only adjustment I made to the original 1900 recipe is that I used frozen lima beans. I just tossed them in the casserole with the ingredients, no pre-cooking necessary.

The Results

limas3
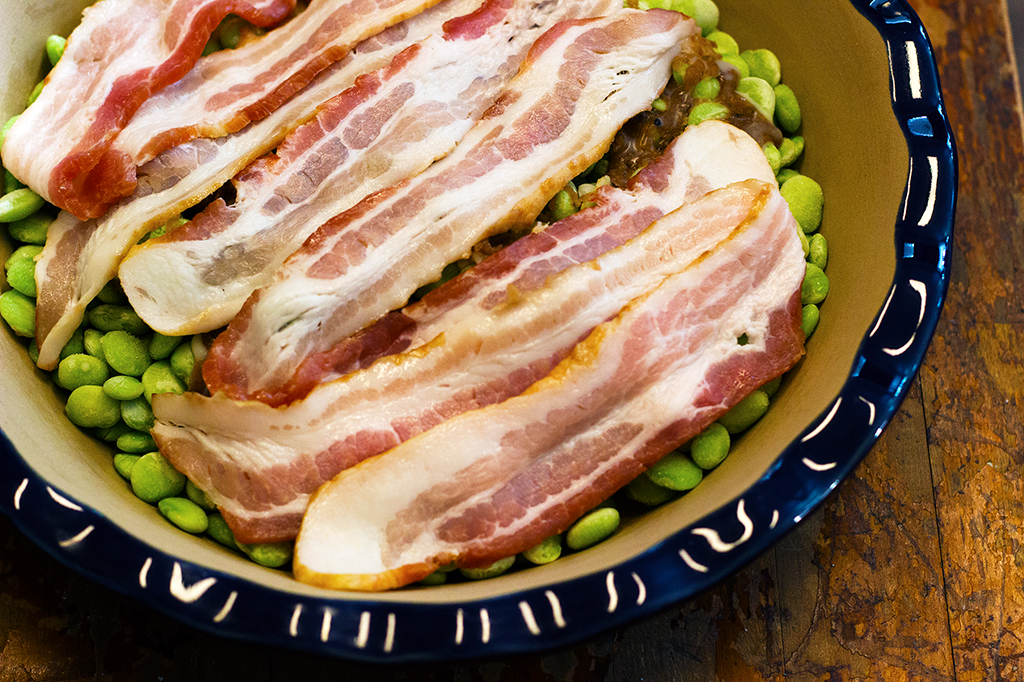
Ready for the oven! Photo by Jess Tsang.

I have some good news and I have some bad news.

The good news: Lima beans, butter, brown sugar, and bacon is a GOOD THING. It is sweet, salty, and rich. The limas have a satisfying snap in your mouth, a salty smokiness from the bacon, and a mouth-covering fatty sweetness. My only advice: cook the bacon separately and mix it in just before serving. Cooking it on top of the casserole, as the recipe suggests, results in flimsy, flaccid bacons. If the bacon has been perfectly crispy little squares, crunching around in there with the butter and the beans…oh…it would have been heaven.

The bad news: Holy shit did those marshmallows just ruin everything. Basically, this recipe took a wonderful casserole and put marshmallows all over the top of it. The overwhelming sweetness, the sticky gelatinous texture…the entire taste and horrific mouth-feel was so shockingly unappealing it’s difficult to put into words. Just imagine how bad you think this recipe would taste, and then understand that’s actually how bad it does taste, and then don’t put marshmallows on any vegetables this holiday season.

limas4
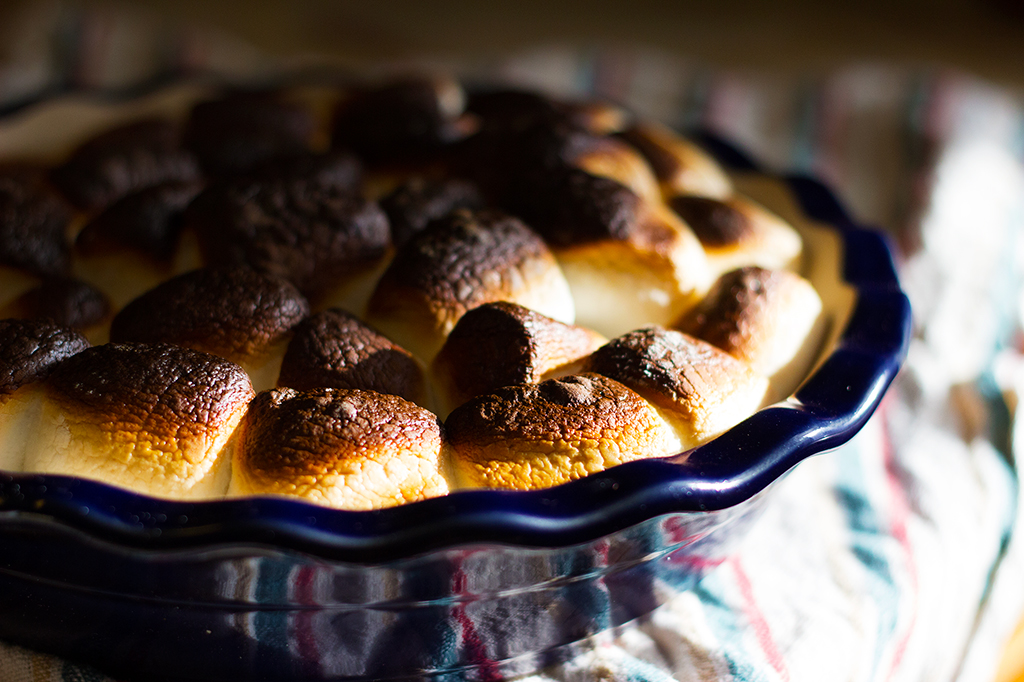
So beautiful yet so horrible. Photo by Jess Tsang.

This blog post was put together with a boatload of help from intern Jess Tsang. Thanks, Jess!

A Revolutionary Menu: Apple Pan-Dowdy

The origins of Apple Pan Dowdy are shrouded in mystery.  Undoubtedly related to crumbles, slumps, and crisps, the recipe I decided to  feature in my Edible Queens article comes from a cookbook published at the same time as the 1964 World’s Fair, The American Heritage Cookbook. However, the first time I’ve been able to find the dessert in print is in Miss Corson’s Practical American Cookery, published in 1886.  Her version is a much juicier than the ’64 recipe, a juice the soaks into the pie crust top and begs to be licked off the plate.  After I devoured the dessert, I poured this juice from the bottom of the baking dish and cooked it down into a syrup which I served atop vanilla ice cream.  Oh god so good!

The temperature is going to be pushing 100 here in NYC on Independence Day, so I know that last thing you want to do is heat up your oven and bake.  In fact, I doubt the legitimacy of this dish as an 18th century July Fourth favorite–considering not only the summer heat, but why would you use last year’s old nasty apples to bake when so much fresh fruit abounds in July?  However, this recipe is a great way to use up extra pie crust. Pieces of crust are strewn across the top, then “dowdied” by pushing them into the baking apples; the crust absorbs the juices and becomes soft and biscuit-like.  And it is delicious; so if you have air conditioning, I say bake away.

***
Apple Pan-Dowdy
From Miss Corson’s Practical American Cookery by Juliet Corson, 1886.

5 large baking apples
1 tsp. cinnamon
1 tsp. salt
1 lb light brown sugar (about 1 1/2 cups)
1 c. cider
1 nine-inch pie crust, store bought or homemade


1. Preheat oven to 325 degrees.

2. Mix together sugar, cinnamon, and salt. Peel and core apples and cut in to ¼ inch thick slices; mix with lemon juice to prevent browning. Toss with the sugar and spices and pile into the baking dish. Pour cider over apple mixture.

3. Cover apples with pie crust by weaving together wide strips, or by simply scattering torn pieces of crust over the top. Bake at 400 degrees for one hour. Serve hot or cold with a dollop of whipped cream.

History Dish Mondays: A Cake Bakes in Queens

Puff Cake, a la Mrs. Osborn.

Today is a very special HDM, because I am collaborating with the lovely Susan LaRosa of a Cake Bakes in Brookyln.  Susan focuses on early 20thcentury cakes and she plans to make several hundred of them from handwritten recipes reclaimed from flea markets in Ohio.

I love the way Susan brings these recipes to life.  Because they are handwritten, each recipe has its own individual character.  They seem to speak about the woman who sat down and penned them 75 years ago or more.

Susan and I decided to trade, and bake cakes from each other’s collections.  I loaned her a cookbook published in the 1880s which has pages of handwritten cake recipes attached in the back (like  “Altogether Cake“).  Susan gave me a stack of her own materials to pick from, but I knew right away which one I wanted:  Mrs. Osborn’s Cakes of Quality.

The book is brittle and crumbling; the pages within are individually typed and simply bound.  The book was sent to housewives across the country who wrote in and requested Mrs. Osborn’s advice.  Who was she?  We don’t really know.  Her writing seems to indicate she was a woman left without means who turned to baking to support herself.  Susan calls her the “Patron Saint of Cakes,” and wrote this post about what she knows about Mrs. O and what she’s trying to find out about this mystery woman.

The introduction to Mrs. O’s book declares:  “If you follow my directions, you simply cannot fail.  You’ll earn the admiration–perhaps the envy, in some cases–of your neighbors.  None of them will be able to make cake which will equal yours.”  Her writing has an air of letting you in on a great secret–and Mrs. Osborn’s cake making techniques are wildly different.  She has you put the cake into a cold oven– a cold oven!!  Mrs. Osborn suggests: “Try Puff Cake first.  This is a fine cake and very easy to make.  This will acquaint you with my system and then you will be ready to make Angel, Klondike, and the others.”  Who was I to disagree?  Puff Cake it is.

***

Puff Cake
From Mrs. Osborne’s Cakes of Quality, by Mrs. Grace Osborne, 1919.

I have a confession: despite my mother constantly admonishing my sloppy measurements as a child, I’ve grown into a sloppy baker.  Baking does take a certain understanding of chemistry, yes; but not until watching Top Chef did I realize outsiders saw it as a secret alchemical art form.  I find baking as easy as cooking: it allows for some improvisation and (thankfully) there is some margin for mistakes.

But Mrs. Osborn threatened me to “…Do exactly as I tell you,” and I did.  I sifted and sifted and leveled my measuring cup with a knife—a practice I’ve not kept up since leaving the watching eye of my mother. The cake mixed well, but I was nervous about trying Mrs. O’s baking techniques.  I have no idea how she monitored her baking temperature so exactly– even using a thermometer.  It seems like it would be an hour and a quarter of constant fussing to get the temperature just right.  I decided to bump my temperature up at the end of each 15 minutes and see what happened.

I ended up pulling the cake out of the oven fifteen minutes early.  After it cooled, I cut it and saw it had gotten a little dark on the bottom–not burned, just browned.  My roommate and I tried a slice: “Tastes like cake,” he said.  It was exactly what I had been thinking.

The cake was very fluffy from the beaten egg whites and had a butteryness that angel food cakes lack.  The browned bottom tasted oddly like a pretzel at first; then, the next day, it tasted downright bitter.  The cake will be disposed of.

Although I’ve had a bit of a disaster with Mrs. O’s baking methods, I’m still tempted to try another cake from her book.  But at the moment, I’m not inspiring any cake-envy.

History Dish Mondays: A Very Fine Charlotte Russe

This very fine dessert is the second in my series of experiments with early chemical additives and my second attempt at a Charlotte Russe. Let’s kick off with the epic recipe I followed to make this thing:

***
A Very Fine Charlotte Russe

From The Lady’s Receipt Book by Eliza Leslie, 1847

***

I’m not going to provide you with a modern version of this recipe, because I discourage you from making it.  It didn’t taste bad, but the effort just wasn’t worth it.  However, I will walk you through the steps I took to recreate this “elegant” dessert.

First, I baked a cake.  I googled around for an almong sponge cake recipe (thank you, Martha Stewart).  I baked the cake in a glass bowl, so that it would begin to take the shape of a domed mold.  When it came out of the oven, I hollowed out the middle and saved the resulting cake scraps.  While still warm, I pressed the cake into a smaller bowl to create a deep well to recieve to all the very fine custard I was about to make.

I boiled one cup  of whole milk with a vanilla bean and a few blades of mace.  After about ten minutes, I removed the milk from the heat and plucked out the bean and mace, and whisked in one cup of heavy whipping cream.  I set this mixture aside to cool.  In the meantime, I beat three large eggs  in an electric mixer until aerated and light in color.  When the milk mixture was room temperature, I added the eggs in a slow drizzle, whisking constantly.  I returned it to a medium heat on my stove top and cooked it for about ten minutes, stirring constantly.  The resulting custard went into the refrigerator to cool.

In the meantime, I busted out my Isinglass, and dissolved it in a cup of boiling water.  Here’s where things went a little wrong:  I think the isinglass needed to be boiled in the water for a longer time.  After it cooled, and I mixed it with my custard, it left tapioca-like beads in the pudding.  It was an unpleasant texture that I think could have been avoided.  Lesson leaned: cook that isinglass long and hard.

I added four tablespoons of sugar to the custard and isinglass mixture, and set it aside.  I measured out a cup of white sugar into a bowl, and rubbed it on the skins of two lemons.  This is a trick also used in punch making; it releases the flavorful oils contained in the lemon’s skin.  I juiced the lemons and added the juice to the sugar, then added one cup sherry and half a cup brandy.  I stirred the mixture until the sugar was dissolved.  I added four cups of heavy whipping cream, and again used my mixer to beat the heck out of it.  The resulting boozey whipped cream was folded into the custard, and this mixture went straight into my almond-cake-mold.  I covered the bottom with the cake scraps I had set aside.  I put it in the refrigerator to set.

An “icing made in the usual manner” meant a royal icing: a basic recipe of egg whites, powdered sugar, and egg whites.  After about half an hour, the almond cake and custard was set.  I flipped it out of the mold, iced it, and decorated it with fresh raspberries.

Jebus. This is a fussy recipe to say the least.  The luxury of an electric mixer was an incredible time saver; note that to prepare this recipe in 1847 you had to make two meringues and one whipped cream BY HAND.  Not to mention I had the modern conveince of a refrigerator to set the custard.  The entire process still took me well over an hour to complete.  The end result?  Underwhelming.  Edible, sweet, and boozy; but somehow not worth all the effort that went into it.

I think the point of this recipe was not the taste; but rather all the work that went into it.  I find it hard to believe that the average housewife was preparing a Very Fine Charlotte Russe, even for the most special occasions.  However, most middle and upper class households had servants.  Time consuming and labor intensive, the job of the cook was the first to be relinquished by the lady of the house to hired help.

After the turn of the 20th century, when the servant trade began to fade, the lady of the house instead turned to new convenience foods.  Canned, pre-packaged, and easy to prepare, she would use these products to cut down on cooking time, so she could use her day for other pursuits (and when I say she, I mean you and me).

So I believe a Very Fine Charlotte Russe was a recipe desgined to show off the skill of one’s servants and the wealth of one’s household.  At any rate, stay away from it, unless you’ve got a few servants of your own.

History Dish Mondays: Port Wine Jelly

This is the first of my experiments with a few 18th/early 19th century chemical additives.  Today, one of President Jefferson’s favorite desserts, Wine Jelly, made with the aid of Isinglass and Gum Arabic.
***
Port Wine Jelly
From Directions For Cookery, In Its Various Branches. By Miss Leslie, 1840
1 cup of water
1 oz isinglass
1 oz gum arabic
2 cups port wine
2 ounces rock candy, or 3 tablespoons sugar
½ nutmeg, grated

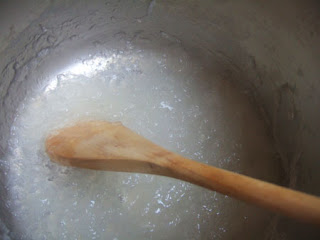
1. In a medium saucepan, heat water and isinglass, stirring constantly until isinglass has dissolved.  The resulting liquid with be thick and tapioca like

2.  Add wine, gum Arabic, sugar and nutmeg.  Bring to a boil, and boil for ten minutes.  Stir constantly, because things get stuck to the bottom, boil over, or burn.

3. Strain through a cloth, like muslin or several layers of cheesecloth.  Pour into a mold (I used four ramekins).  Set aside until it comes to room temperature, then refrigerate overnight.

***

When I was cooking the isinglass, it had a distinct ocean smell.  Like salty sea air.  I guess that’s because it comes from inside a fish.  The gum arabic also had a distinct smell–like an old jewelry box.  When I cooked everything together, it had the consistency of simple syrup.

After I poured the concoction in a mold and let it set, I popped it out of the ramekins and cut a slice to sample.  I was already surprised– the texture was not at all how I thought it would be.  I was expecting something like a jello; in reality it was more like fruit leather or Turkish delight.  Very dense.

It didn’t taste very good—it made me make an unhappy face.  The flavor of the chemical ingredients was stronger than that of the port wine.  It might have been enjoyable if consumed in a time when their weren’t a lot of sweets available, like in the early 19th century, but  in the 21st century it’s really pretty blah.

BUT–I was thrilled that it came together chemically.  I mixed together strange bags of suspicious looking substances, and the final product set just how it should.  Who figured this stuff out in the first place?  Like “Let’s make a fancy dessert out of these crispy strings I found in a sturgeon!”

It makes me brave to try my next isinglass experiment, a “Very Fine Charlotte Russe.”

History Dish Mondays: Roast Bear

Roast bear with mushrooms and a hot apple toddy; film still from an upcoming episode of New York Wave.

Over the past few weeks, I’ve been shooting a short documentary about my work for PBS Japan, for a show called New York Wave.  They wanted me to prepare dinner for the show’s host and asked if there was anything unusual that I have been aching to cook up.

It came to me like a flash:  Roast Bear.

A few months previous, I had been digging through the massive menu collection at the New York Public Library.  One of their earliest menus, from 1842, was a dinner thrown in New York in honor of Charles Dickens.  Over 3,000 guests attended, and  the menu was extensive (See the original menu here.)

Roast Bear was served that evening.  I thought it was so unusual and fascinating–I had never seen bear included on a menu, let alone in New York city.  After doing a little more reading (in the very handy Oxford Encyclopedia of Food and Drink in America) I found out that bear was commonly hunted and eaten in early America; in the 19th century, it was still sold in markets in New York.  Until the end of the century, roast leg of bear was served as a delicacy in New York restaurants.

It was decided: we would eat bear for dinner.  So where does one come across bear meat in this day and age?  You cannot sell hunted game meat in America–game sold in markets today is farmed.  The best way to get it is to make a few friends in Alaska, which I happen to have.  It’s legal to hunt bear there, and if you ask really nice, someone will know someone who would be willing to ship you a roast or two.  And if you’re really lucky, about six pounds of black bear rump meat and tenderloin will arrive via airmail to your Queens apartment.

The next challenge was figuring out how to cook the meat.   I consulted Feeding America to see if any recipes for bear had appeared in American cookbooks.  I came up with one hit, from Miss Corson’s Practical American Cookery (1886):

I consulted Miss Corson’s recipe for roast beef; and she recommends searing it, roasting it, and then preparing a simple gravy from the pan drippings.  This method sounded about right; I wanted to prepare the meat simply to get the full effect of its flavor.

***
How to Roast a Bear

Eating omnivores, like bear,  can give you all kinds of parasites.  It’s best to cook it well done; I used the same temperature guidelines recommended for cooking pork. I cooked a rump roast, but this recipe should work well for any smaller cut of bear.

1 bear roast; 1-4 lbs
Salt and Pepper
Butter
1-2 cups mushrooms (or squash, parsnips, etc.  Something earthy and nice)
1 tablespoon flour
2 cups boiling water

1. Preheat oven to 425 degrees.  Rinse bear meat and part dry.  Cover generously with salt and pepper.
2.  Clarify the butter: heat it in a microwave until it melts, then gently skim off the fatty solids that have separated to the top.  Pour butter into a cast iron skillet, being careful not to disturb any sediment that may have sunk to the bottom.
3.  Heat skillet over high heat.  Place bear in skillet and sear on all sides until browned.  Add mushrooms to the skillet–it’s ok if the bear is buried in shrooms.  They’ll cook down.
4. Move bear directly from stovetop into oven; roast 10 minutes per pound, until a meat thermometer in the center reads 145 degrees.  Remove from oven and allow to rest before carving.
5. In the meantime, make the sauce.  Pour bear drippings from the skillet into a saucepan and add flour.  Cook over medium heat until the flour is browned, then add water while whisking constantly.  Let the sauce cook until it thickens to your desired consistency–anything from a thin sauce to a thick gravy is fine.
6.  Carve meat into one-inch thick slices.  Serve, topped with mushrooms and sauce.


***

The gravy is a must because the meat is a little dry; and because the sauce is made with pure bear goodness, it doesn’t detract from the flavor, but enriches it.

After my first bite of bear, if someone had told me it was beef, I would have believed them.  There is a darker, gamier note, but not the stringy, gamey meat I expected.  It was more than edible–its was good.  I ate my whole plate.

History Dish Mondays: Turtle Soup

Photo by Everett Bogue

Yesterday, I cooked up a batch of a popular 19th century summertime treat, Turtle Soup.  It went over surprisingly well with my friends!  But you’ll have to wait to read more about it: I was testing my turtle recipe for an upcoming article in Edible Queens magazine.  The Summer 2010 issue will feature this dish and many more.

History Dish Mondays: Bazmaawurd, Mulahwajah and Juudhaab

Bazmaawurd ready to be rolled.

A few weeks ago, I mentioned the article Cooking with the Caliphs, which analyzed a medieval cookbook from the court of 10th century Baghdad:

“A little over a thousand years ago, an Arab scribe wrote a book he titled Kitab al-Tabikh (The Book of Recipes)… The book has come down to our time in three manuscripts and fragments of a fourth—and what a treasure it is. These are the dishes actually eaten by the connoisseurs of Baghdad when it was the richest city in the world.”

Yesterday, I had a few friends over, and we tried some of these 1,000 year old dishes.

To begin, I presented Bazmaawurd: chicken, walnuts, fresh herbs and lemon (it was supposed to be citron, but I couldn’t find one fresh) rolled up in a Lavash.  I think this was everyone’s favorite.  The flavors were so fresh, light and zesty.  I found it to be a little dry–but it went nicely with some labneh.
Next I dished up a seasoned lamb dish called Mulahwajah, of which I neglected to take any photos (tipsy).  I stewed lamb meat with leeks, onions, a cup of water, and a fascinating spice blend:  coriander, cinnamon, caraway, pepper, and galangal.  The latter is a spice with a light, flowery, almost citrus taste.  And this recipe calls for a lot of spice: 5 1/2 teaspoons for a 1/4 pound of meat.  It covered the meat completely, but lamb has such a pungent flavor it stands up well to heavy spicing.  The result was a dish that blurred the boundary between sweet and savory with flavor unfamiliar to western tongues.
Lastly, I made Juudhaab: “The supreme roast meat dish was juudhaab (or juudhaabah), where the meat was served on a sweet pudding which had been baked at the bottom of the tannur to catch its dripping juices.”   This dish is vaguely similar to Yorkshire Pudding, in that a soft bread is cooked using fat from the meat it is served with.  But the resemblance is remote; in fact, I have never heard of a food prepared quite this way before.
***
Juudhaab
From Kitab al-Tabikh by Abu Muhammad al-Muzaffar ibn Sayyar, approx. 945 AD

Translated by Linda Dalai Sawaya for Cooking with the Caliphs.

1 whole chicken
¼ cup plus 2 tablespoons rosewater
ground saffron
1 pound dried apricots
2 fresh lavashes, pitas or other flatbreads, 12″ in diameter (or more, if smaller)
½ cup brown sugar

1. Preheat oven to 500 degrees. Place apricots in small saucepan, add water to cover apricots by ½ inch. Bring to a boil and stew until apricots are soft and the water has reduced to a thin syrup, about 15-20 minutes.

2. In a baking pan or bottom of a broiling pan, place one lavash.  Strew with apricots in syrup, sugar and 1/4 cup rosewater in which pinch of saffron has been dissolved, then cover with remaining lavash.  Cover with a wire rack or top of the broiling pan.
3.  Wash chicken and pat dry. Mix 2 tablespoons rosewater with pinch of saffron and rub on chicken, inside and out. Place on rack or on broiling pan.
4. Bake at 500 degrees for 20 minutes, then turn heat down to 325.  Roast until a thermometer inserted into the thickest part of the thigh reads 160-165.
5.  Carve chicken and serve in slices over the lavash and apricot pudding.
***
The result was interesting: I wasn’t thrilled with the slightly greasy taste and texture of the sweet pudding.  But my guests tore into it with grunts and “mmm”s.  The lone vegetarian was mortified.  But we still love her.

Check out all of these recipes and more in the original article here.

History Dish Mondays: Charlotte Russe

I work part time as an educator at the Lower East Side Tenement Museum(Wednesday and Saturday if you ever want to stop by and see a tour). While studying information for a new tour, I came across a mention of “Charlotte Russe.”  Charlotte Russe, it said, was sold from pushcarts on the streets of the Lower East Side in the 1920s.  “What the hell’s Charlotte Russe?” I wondered.

Charlotte Russe, in it’s simplest form, is whipped cream adorned with lady fingers.  The fanciest version I’ve seen involves mace-flavored whipped cream, mixed with isinglass, and pressed into a mold lined with almond sponge cake.  Sounds pretty good, right?  I plan to give this latter recipe a whirl in the near future.

Left: Image from Miss Corson’s Practical American Cookery and Household Management. by Juliet Corson, 1886.
For this experiment, I selected a recipe of middling complexity that was close to the time period I was learning about.  It comes from Fannie Farmer’s infamous Boston Cooking School Cookbook, one of the most popular cookbooks of its time because it was the first to offer standardized measurements.

***
Charlotte Russe
From The Boston Cooking School Cookbook (Seventh Edition) by Fannie Merritt Farmer, 1941.
1 packet gelatin
1/4 cup cold water
1/2 cup whole milk
1/3 cup superfine sugar
1 cup heavy whipping cream
1 1/2 tsp vanilla
1 package (about 20) ladyfingers

1. Line a mold with the ladyfinger cookies.  A medium-sized bowl works just fine.

2. Beat cream with an electric mixer until it forms stiff peaks. Set aside.

3. Dissolve gelatin in cold water.  Heat milk in a microwave for two minutes on high, then add to gelatin.  Add sugar and vanilla, whisk until sugar is dissolved.

4. Set in a pan of ice water, stirring constantly until the mixture just begins to thicken.  Or, you can place the mixture in the freezer, stirring every minute.  But be careful!  If the mixture gels too long, you’ll end of with tapioca-like lumps in the final product.

5. Beat with an electric mixer on high for five minutes; then add in 1/3 of the whip cream and mix until thoroughly combined.  Gently fold in the remaining whip cream with a spatula until just combined.

6. Pour into the ladyfinger mold, using a spatula to smooth out the top.  Refrigerate for at least two hours, or until set.  Turn out onto a plate and serve.
***

I served this at a dinner party and we all agreed it was tasty, but a little plain.  It was like inside-out angel food cake.  I think although it was a little boring for our modern day pallets, it probably would have tasted like heaven to a kid on the streets in the 1920s.

Update: After a little poking around on the internet, I found a few descriptions of what Charlotte Russe would have looked like in New York.  I has assumed it was a simple version, just whipped cream and lady fingers, but it was held in a cardboard contraption that made it easy to eat on the go.  From The Food Timeline:

“Charlotte russe. A French dessert (supposedly created by Marie-Antonin Careme) made in mold with ladyfingers and Bavarian cream…While this confection is known and made in the United States, a simple version consisting of a square of sponge cake topped with whipped cream (sometimes with chocolate sprinkles) and a maraschino cherry was also called a “charlotte russe”…This was a standard item in eastern cities, particularly among urban Jewish Americans (some of whom pronounce the item “charely roose” or “charlotte roosh”), who made it at home or bought it at a pastry shop, where it was set on a frilled cardboard holder whose center would be pushed up as to reveal more cake as the whipped cream was consumed.”
Encyclopedia of American Food and Drink, John F. Mariani [Lebhar-Friedman:New York] 1999

“…But to old-time Brooklynites, a charlotte russe was a round of sponge cake topped with sweetened whipped cream, chocolate sprinkles, and sometimes a marashcino cherry, surrounded by a frilled cardboard holder with a round of cardboard on the bottom. As the cream went down, you pushed the cardboard up from the bottom, so you could eat the cake…these were Brooklyn ambrosia.”
The Brooklyn Cookbook, Lyn Stallworth and Rod Kennedy, Jr. [Alfred A. Knopf:New York] 1994 (p. 386)

So you pushed the whole thing up like a cake and cream push pop.

History Dish Mondays: The Original Christmas Cookie

cookies_1The original Christmas Cookie, flavored with coriander.

This recipe comes from Amelia Simmons’ book American Cookery, the first cookbook of American authorship, published in 1796.  It’s one of the earliest printed uses of the word cookie or “cookey,” an Americanism derived from the Dutch word koekje, a little cake that was offered as a treat to New Year’s day visitors in New York City.

It was published at a time when Christmas was not uniformly celebrated.  Santa Claus wasn’t invented for another thirty years, and the domestic, gift giving Christmas we’re familiar with today did not exist.  There was a great debate as to whether Christmas should be celebrated piously, in quiet prayer and devotion; or in a more traditional Solstice celebration, with a focus on drinking and mischief.  “The Antics” were roaming the streets of Boston, a rowdy gang who burst into the houses of the wealthy, and acted out bawdy plays for a reward of money or alcohol.  “Callathumpian bands” paraded around the streets of New York, their purpose to make as much noise and cause as much chaos as possible.

For more on the origins of modern Christmas, read Stephen Nissenbaum’s amazing book, The Battle for Christmas.  I don’t know more about this recipe in particular, but I was intrigued to taste the earliest American Christmas cookie recipe that I know of.

This recipe is essentially a sugar cookie flavored with coriander, which is the dried seeds of cilantro (and technically, cilantro is fresh coriander). Simmons’ receipt is vague, so I searched for a modern recipe I could retronovate, and found the perfect solution in Martha Stewart’s Old Fashioned Sugar Cookie.  This recipe appealed to me because it uses an interesting modern technique of applying a double layer of sanding sugar, which gives the cookie a sweet glaze.  I altered the batter so it would be closer to Simmons’ original recipe.  For a slightly more authentic Christmas Cookey, I recommend using a recipe for Springerle cookies, a traditional Dutch treat, and replace the anise flavor with 1-2 tsp. of ground coriander.

***
Christmas Cookeys

From American Cookery by Amelia Simmons (1796).
Modern recipe derived from Martha Stewart’s Cookies: The Very Best Treats to Bake and to Share.

3 cups all-purpose flour
1 teaspoon baking soda
1/4 teaspoon salt
2 tsp ground coriander
Zest of 1 lemon, plus 1 tablespoon fresh lemon juice
1 1/2 cups granulated sugar
1/2 cup packed light-brown sugar
1 cup unsalted butter, (2 sticks), softened
2 large eggs
Sanding sugar, for sprinkling

1. Whisk flour, baking soda, coriander and salt into a bowl; set aside.

2. Using an electric mixer, beat sugars, lemon zest and butter at a medium speed until pale and fluffy. Add eggs, one at a time, then lemon juice, mixing between each addition. Scrape down bowl with a rubber spatula.

3. Reduce mixer speed to low and gradually add flour mixture. Mix until just combined.

4. Scoop dough into a ziploc bag or sheet of plastic wrap. Form into a ball and refrigerate for at least an hour.

5. Preheat oven to 350 degrees. Break off a 1/4 of the dough ball. On a generously floured surface, roll out dough until it is 1/4 inch thick. “Cut or stamp in shape and size you please (Simmons),” and place on a baking sheet. “Sprinkle tops with sanding sugar, then lightly brush with a wet pastry brush; sprinkle with more sanding sugar (Stewart).”

6. Bake for 7 minutes, turning half way through.

***
I really like these cookies; they’re a simple sugar cookie, with a kick of fresh citrusy flavor form the coriander. I’ve boxed them up with some Chocolet Puffs and Cayenne Gingerbread, and they’ll make a lovely Christmas gift.