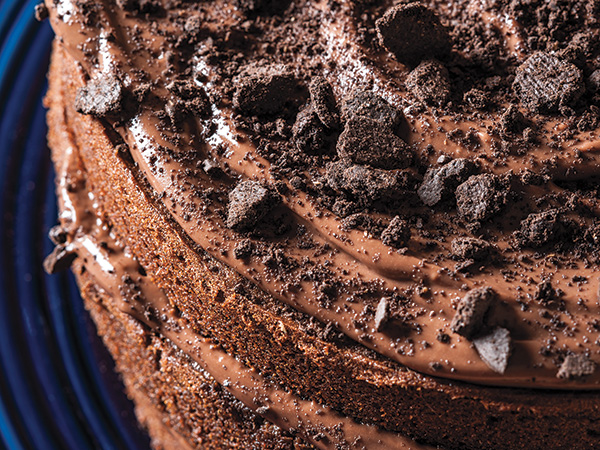
 Brooklyn Blackout Cake. Photo courtesy The Way We Ate.
Flipping through my new copy of The Way We Ate: 100 Chefs Celebrate a Century at the American Table, I came across Rachel Wharton’s recipe for Brooklyn Blackout Cake. The book features a century of recipes from some of New York’s most prominent foodies; Rachel Wharton, one of the editors of Edible Manhattan and Brooklyn in one of my favorite people, and Brooklyn Blackout Cake is a double chocolate dessert that has some interesting history, leading all the way back to World War II and the Brooklyn Navy Yard.
During World War II, the Brooklyn Navy Yard was one of the United State’s most important ship building yards. In its heyday, it employed 71,000 workers, including blacks, Hispanics and 5,000 women. They held managerial jobs, made equal pay as white men, and even did the same work–including women welders.
Food in this era was most strongly shaped by rationing and shortages  Owners of local diners had to stand in ration lines for hours to get food for their restaurants, often simply shutting down the business instead of struggling to procure food. Even the Navy Yard commissary had difficulties: fresh fruits were scarce, coffee intake was limited, and luxuries like chocolate were especially hard to find. Sugar was rationed, cacao processing plants lacked labor, and what was produced was mostly sent to the front. Chocolate was a valuable source of energy, as well as comfort, for the soldiers who were fighting.
However, workers in the Navy Yard remember the smell of chocolate wafting over their workplace from Rockwood’s chocolate factory. Founded in 1904,  the company would become the second-largest chocolate producer in the country, ranking only below Hershey’s. The complex on Washington Avenue in Brooklyn converted raw cocoa into treats like Rockwood bits – their answer to Tollhouse Chocolate chips.  They also had major government contracts during the war, and their dependency on these contracts is perhaps why the went out of business in the post-war 1950s. Their factory, marked “Van Glahn Brothers” for the wholesale grocers who originally built it, can be easily seen from the BQE and is now “upscale loft units.”
There was another chocolate confection maker in the Navy Yard area that thrived before and during WW II: Ebinger’s Bakery. The store opened in 1898 on Flushing Ave., just outside of the Yard.  Ebinger’s was part of a tradition of commercial baking in the neighborhood, particularly German bakers. These shops presented an air of authenticity by hiring shop girls with German accents.
Ebinger’s is most reminisced about for its chocolate cake, “with its two layers of moist chocolate cake, soft chocolate cream separating the layers, soft creamy chocolate icing, sprinkled over with crumbs of the chocolate cake itself.(source)” Cake with a crumbled cake topping is very meta. Although this cake was probably first produced in the early 20th century, it got its famous name during World War II.
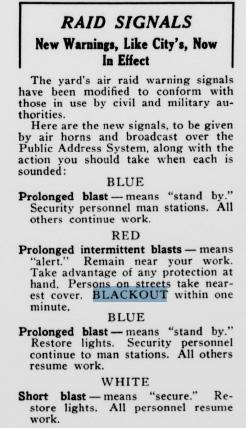
 “Brooklyn, like the rest of the city, was subject to blackout drills,”  Andrew Gustafson of Turnstile Tours told me. Turnstile offers historic tours of the Brooklyn Navy Yard.
“In January 1942, a German Uboat even entered New York harbor, saw the lights of Lower Manhattan still ablaze, and used  the city lights to sink two tanker ships in short order. ” Action needed to be taken to protect the American ships entering and leaving the NavyYard.
“The first citywide blackout drills were held in June 1942, and throughout the war, much of the city went through a permanent ‘dimout.’Â In Brooklyn specifically, the lights of Coney Island were essentially turned off throughout the war, as they were in Times Square, giving birth to many innovative mechanical signs, like the smoking Camel sign.”
Ebinger’s, being a neighbor of the Brooklyn Navy Yard, decided to name their chocolate-on-chocolate cake after the war-time events: Brooklyn Blackout Cake.
Although Blackout Cake is a beloved New York City- born food, Ebinger’s filed for bankruptcy in the 1960s, and closed for good in 1972. Many feel they were victims of anti-German sentiment during and after WWII. Some fans of the cake bought one before the bakery closed and it kept it in their freezer for a year.
Ever since, it feels like old school New Yorkers have been on a search to find a perfect replica of the Blackout cake. It might be one of those things that only tastes best in memory, but I don’t think it would hurt to give Rachel Wharton’s recipe a try. You can find her recipe here.


 Lemon-lime, mango, coffee, and strawberry egg creams.


