Archive for the 'history dish mondays' Category

Page 3 of 3

History Dish Mondays: Lemon Ice Cream

I’m planning an Ice Cream Social for the late spring, possibly to coincide with the Kentucky Derby. So I wanted to begin testing out a few ice cream recipes, and I decided to use the menu for Lincoln’s second inaugural banquet as a reference. Because if it was good enough for Lincoln, it’s good enough for me!

Lincoln’s guests were treated to Burnt Almond Ice Cream, which is built around a caramel base; Maraschino ice cream; and Lemon ice cream, which my friend Eva at the Merchant’s House Museum tells me was one of the most popular ice creams in the 19th century. I’ll be trying all of these, along with two modern creations (Cashew Cookie Dough and Chai Tea) and a frozen Mint Julep inspired by Jerry Thomas’ original julep recipe.

But first, Lemon Ice Cream. The recipe is as simple as can be. I made only a small amount, but this recipe can be multiplied to suit your needs.

1 pint cream
1/2 cup sugar
Zest and juice of 1 lemon
Add the sugar to the cream, a little at a time, and mix until combined. Grate the zest of one lemon into the cream mixture, being careful not to add any of the bitter, white pith. Juice the lemon and add to the cream, mix to combine.

Let the mixture sit in the refrigerator for an hour or more to steep. I let mine sit overnight. Pour to mixture through a fine sieve or cheesecloth to remove the lemon zest. Pour into an ice cream maker, and let it freeze for about 15 minutes. Be careful not to over mix, or you’ll get frozen lemon butter. I like ice cream straight from the ice cream maker; the texture is similar to soft serve. But it is generally suggested that it should harden in the freezer for at least an hour before serving.

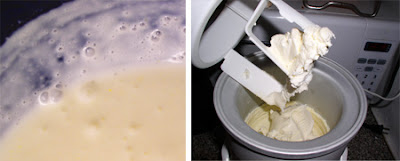
Left: The mixture of cream, sugar and lemon steeps. Right: Coming out of the ice cream maker. I left it in a little too long and it got a little buttery, but it was still good.

Rating: A+ This was easy to make and Delicious. Refreshing and smooth, this would be really enjoyable on a summer day. But it’s very, very rich–it is pure cream, so a little goes a long way.

History Dish Mondays: Dough Nuts

I just…didn’t get a good photo this time.

Donuts have a long history in America, having said to be brought here by Dutch settlers, who landed in New York in 1614.
This recipe uses a chemical leavener instead of yeast, making the taste and texture like a historic funnel cake.

***

Dough Nuts
Original Recipe from The Frugal Housewife, Dedicated to Those Who Are Not Ashamed of Economy. By Lydia Maria Francis Child Boston: Carter and Hendee, 1830.
Modern Recipe adapted from the Old Sturbridge Village Cookbook.
4 tablespoons butter
1 cup sugar
3 eggs
2 cups flour
1 teaspoon baking powder
1 teaspoon cinnamon
Fat or oil for deep frying
1. Sift and measure flour; mix in baking powder and cinnamon.
2. Cream butter and sugar.
3. Add eggs one at a time and beat well after each egg.
4. Slowly ass dry ingredients in three batches, mixing well at a low speed after each batch.
5. Preheat an electric fryer to 375 degrees.
6. Carefully spoon blobs of dough into the hot oil. Flip when the bottoms turn brown. The dough should fry between 90 seconds- 2 minutes.
7. Remove from oil and pile onto a plate covered with paper towels. While hot, sprinkle with sugar and additional cinnamon.

I used my boyfriend’s deep fryer, and heated the oil to a little above 375, since it cools when you drop the batter in. This was my first time making dough nuts from scratch, and also my first time using a deep fryer. I drop spoonfuls of batter into the hot oil, no bigger than an inch. They will poof up to three times their size, and if the balls are too big, they get dense and undercooked in the middle.

I sprinkled my hot Dough Nuts with granulated sugar and cinnamon, but I think powdered sugar would have been even better. This recipe makes about two dozen. They were delicious–but quite rich and heavy, so I would recommend either halving this recipe, or inviting over a bunch of friends

I found the taste and texture to be delightful, the outside crispy and the inside cake warm and tender. Not at all dense like most cakes from the time period. Between three people, we probably ate about a dozen.

I think it’s interesting that the recipe specifically calls for cinnamon, which was not commonly used in the first half of the 19th century. Perhaps it was considered a breakfast spice–I found another recipe that recommends it for pancakes, as well. I’d be interested to try a batch flavored with lemon brandy; A teaspoon of lemon extract would probably be a good substitution.

I also found a recipe for Dought Nuts levened with yeast from Directions For Cookery, In Its Various Branches (1830) by Miss Eliza Leslie. She has a few interesting notes on the receipt:

“They should be eaten quite fresh, as next day they will be tough and heavy; therefore it is best to make no more than you want for immediate use. The New York Oley Koeks are dough-nuts with currants and raisin in them.”

I’d like to try to make a traditional Oley Koek for a future HDM.

Rating: A.
A tasty, filling, sweet treat. Would be great for a party. Everyone loves fried food!

History Dish Mondays: The Blue Blazer

Text not available

The Blue Blazer was the signature drink of infamous mid-19th century bartender Jerry Thomas, author of The Bartender’s Guide. At a recent party I attempted the Blue Blazer, and it didn’t turn out too badly: I scalded myself only slightly, and the crowd sure was impressed.

I also caught wind of a guy who is mixing and drinking his way through The Bartender’s Guide. You can read his blog here.

197 Blue Blazer Use two large silver plated mugs with handles 1 wine glass of Scotch whiskey 1 do boiling water Put the whiskey and the boiling water in one mug ignite the liquid with fire and while blazing mix both ingredients by pouring them four or five times from one mug to the other as represented in the cut If well done this will have the appearance of a continued stream of liquid fire Sweeten with one teaspoonful of pulverized white sugar and serve in a small bar tumbler with a piece of lemon peel

History Dish Mondays: Rusks

I had a packet of yeast leftover from when I made ginger beer, so I decided to mix up a batch of Rusks.
Rusks were a favorite when I worked at a living history museum. In the morning, toasted on the cast iron stove, they could not be beat. I would describe this recipe as “advanced,” especially if you don’t have much experience with yeasty breads.
***
Rusks
Original recipe from American Cookery by Amelia Simmons
Modern Recipe from The Old Sturbridge Village Cookbook

1/4 pound butter
1 cup milk
7 eggs
6 tablespoons sugar
1 package yeast dissolved in 1/2 cup warm water
6-7 cups flour

I halved this recipe.
1. Melt butter and combine with milk.
2. Beat eggs until light; add sugar, yeast and eggs to milk and butter mixture.
3. Stir in 3 cups of flour and beat for 2-3 minutes. Cover the bowl and set in a warm place for an hour or more, or refrigerate overnight.
After the dough has finished rising, add the remaining flour, enough so that the dough is no longer sticky. At this point, you’re supposed to take it out, roll it into 2 logs and cut it into 12 slices. But this is what mine looked like:
Shrug. I heated up some butter in a skillet. I rubbed my hands with some flour, and tour off a slice of the dough. I dabbed it into a little more flour, and patted it between my hand until it vaguely resembled the shape of an English muffin. I tossed it in the hot skillet. Repeat until the skillet is filled.
When it gets crusty and brown, flip it, and push it down with you spatula. You want to make sure it get cooked all the way through! Watch them close–my first batch was a burned disaster. My next two tries came out acceptable.
While these turned out pretty good, they were not as tasty as when my mom makes them. They seemed a little dense, but the bread is sweet and yeasty. I think they’re better the next day, toasted and spread with butter and jam. Or try it as a bacon, egg, and cheese sandwich!
Rating B+
I think my technique needs some work.

History Dish Mondays: Protose

So the big week is finally here: I’ve decided to spend the next five days immersing myself in the diet of the Battle Creek Sanitarium and John Harvey Kellogg. I’m not sure what to tell you to expect–either the delightful world of vegetarian cuisine, or another week of torture comparable to the Tenement Diet.

Protose is one of J. H. Kellog’s invented meat substitutes. I currently have it on my menu for the Dinner on the Road to Wellville party in March. I’m skeptical that it’s not horrible, so I want to give it a try in advance, so that i have time to come up with a suitable replacement, if necessary.

Protose was manufactured by the Kellogg/Worthington company until about 2000; since it was discontinued, there seems to be an online group of hard-core vegans trying to recreated it’s special taste and texture. While searching for a suitable recipe, I came across this fascinating recollection of one man’s experience with the cuisine of J.H, Kellogg:
“Protose. What does that conjure up for me?
You’d never guess.
The three most trusted people that Dr. J.H. Kellogg had working for him were three unmarried sisters: Gertrude, his chief administrator and executor of his will; Angie his chief dietitians; and Mable his chief nurse and the one person who accompanied Kellogg to Ontario to attend the Dion quintuplets.
By the mid-1950’s, the doctor long dead, the three unmarried sisters now running the Sanitarium in Miami Springs would spend the summers back up in Battle Creek at their farm in the country.
My grandfather was the brother to these three sisters and, dying young, my own father was raised by the sisters and Dr. Kellogg.
During the summers we would visit them three or four times for a weekend and invariably one of the meals was the most delicious “roast” made out of Protose. Once you’ve had it, especially the way they prepared it, you were hooked.”
I can’t confirm whether the story is true, but fascinating none the less.
After further research, I came up with this recipe:
***
Protose
Original Recipe from a post on Vegan Food
With variations suggested by Chowhound.com and Ellen’s Kitchen
1/2 cup creamy, natural peanut butter
1 cup wheat gluten (seitan)
1 c vegetable stock
2 T cornstarch
1/2 a medium onion, chopped
1 tsp Italian herb blend
Pinch of salt
Steam in top of a double boiler for three hours, stirring occasionally. Let cool in the pan, turn out on platter and slice.
***
Seitan, if you were wondering, is a vegan food product invented by Buddhist monks in China. You take wheat dough and wash it under water until nothing remains but the gluten. It’s very high in protein, but it also looks like this:

I tasted a tiny bit of it out of the bag. It had a bizarre taste I wasn’t expecting: like burnt maple syrup. Very unappealing.
I buzzed the seitan in a food processor and mixed it up with all the other ingredients. I found out I didn’t have corn starch, so I ended using flour instead. I used McCormick’s Italian Herb Grinder for the seasoning. I took a tiny taste of the mixed ingredients and it tasted like…peanut butter with Italian seasoning.

I set it on a double boiler, and it looked done after about two hours. I flipped it out of the mold and it looked pretty unappealing. I’m preparing it in a dish for dinner today, so we’ll see how that goes. But I have a feeling I’m going to end up taking this one off the menu.

History Dish Mondays: Pain Perdu

Pain Perdu, made with hoo doo.

I had a few slices of Cider Cake left over from last week, so I decided to put it to good use in this recipe for Pain Perdu, or “lost bread.” It’s a Creole favorite similar to french toast.
The source for the modern recipe noted that Pain Perdu was originally flavored with orange flower water, an alcohol based floral flavoring popular in the 19th century. I didn’t have orange flower water, but I did have Florida Water, another 19th century flavouring/perfume with notes of orange flower, lavender, and clove.
According to Florida Water website, it can also be used to treat “Jangled Nerves,” and for “Boudoir Daintiness.” It’s also used for hoo doo. Who knew. (read more.)
I found Florida Water at my local pharmacy, but you can sometimes find it in the Goya food aisle in the grocery store. Orange flower water can be found in the baking section of some grocery stores, or at Middle Eastern food markets.
***
Pain Perdu
Modern recipe adapted from The American Heritage Cookbook.
Dash Orange Flower Water or Florida Water
2 eggs
1 tbsp confectioner’s sugar
pinch of salt
3/4 cups milk
Grated rind of half a lemon
6 slices of “not too fresh” bread; I used left over apple bread.
Combine ingredients and beat thoroughly. Dip slices of bread in the mixture, then fry in plenty of heated butter until crisp and golden brown on both sides. Serve immediately with maple syrup, honey, or a mixture of sugar and cinnamon.

***

This was pretty bad. I made a few slices without the Florida Water first, and they were pretty gooshy, but somehow also dry. Maybe it would have been better with regular bread, but I’m not so sure. After the Florida Water was added, it tasted like–surprise–perfume. I drowned it in maple syrup, but it didn’t do much good. I expected the lemon zest to perk it up with a citrus zing, but no. Not really.

Rating: C+ I would stick to a modern french toast recipe.

History Dish Mondays: Cider Cake

I’m launching a new feature: Each week, I’m going to test a historic recipe. Check in on Mondays to see the results.

This week, Cider Cake. It is fast and easy to mix up and a delicious snack or breakfast. The ingredients are simple, so prep is a breeze.

Cider Cake
Original recipe from The Frugal Housewife by Lydia Maria Child; modern recipe is adapted from The Old Sturbridge Village cookbook.

1/2 cup unsalted butter
1/2 cup sugar (refined, unrefined or maple. I used regular white shug)
2 eggs
3 cups flour
1 tsp baking powder
1/4 tsp nutmeg
1 tsp cinnamon
1 cup apple cider

Preheat oven to 350. Sift flour, baking powder, and spices; set aside. Cream butter and sugar. Add eggs and mix well. Add flour mixture and cider alternately, starting and ending with the flour. Scrape bowl and mix until combined. Pour into a loaf pan and sprinkle top with sugar. Bake 50-55 minutes.

***

Although I used fresh apple cider, this recipe can also be made with hard cider. It’s actually more historically accurate; I think I’ll try it sometime in the near future, I’m curious how it alters the taste. Additionally, Childs says to “spice to your taste.” For the era that this recipe is from, that would usually mean some combination of nutmeg, ginger, and possibly mace. I used cinnamon, not popular in the first half of the 19th century, because I like it best.

When I mixed up the cake and I added the cider, the batter really blossomed with a delicious apple-y smell. I put it into a loaf pan and sprinkled the top with some sugar to give it a nice, sweet, crust. I baked about 50 minutes in a 350 oven, and turned it halfway through.
The cake came out lighter in color than I expected; the level of sweetness and texture reminded me very much of a zucchini or banana bread. I think this recipe could be made even more delicious with the addition of some sliced apples or nuts.

Rating: A
I would make this again.