Archive for the 'baking' Category

Page 3 of 4

The Sourdough Battle: The Great Bake Off

Astoria Sourdough: highly recommended.

The time has come to bake bread from the starters I have so laboriously cared for!

After poking around for a simple bread recipe, I can across the video from the New York Times.


I selected this recipe because I had seen this photo from Simply Sourdough the Alaskan Way, of two turn-of-the-century gentleman making sourdough in cast iron pots. The recipe is so simple, I figured it had to be relatively similar. I found the recipe adapted for sourdough here.

***
Simple Sourdough Bread

1 cup starter
1 cup water
3 cups flour
2 tsp salt

1. Heat oven to 450 degrees. “Put a 6- to 8-quart heavy covered pot (cast iron, enamel, Pyrex or ceramic)” in oven to preheat. In a large bowl combine ingredients. Cover bowl and “let dough rest at least 12 hours, preferably about 18, at warm room temperature, about 70 degrees.”

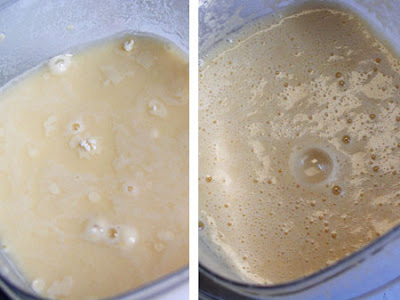
2. “Dough is ready when its surface is dotted with bubbles. Lightly flour a work surface and place dough on it; sprinkle it with a little more flour and fold it over on itself…” (reference video for this technique)

3. Carefully pick up the dough, and drop into the preheated pot. Cover with lid and bake 20 minutes, then remove lid and bake another 15 to 30 minutes, “until loaf is beautifully browned. Cool on a rack.”

***

When I busted out my Astoria (nee New York) Sourdough Starter and gave it a sniff, the smell had definitely mellowed from stinky cheese to almost imperceptibly sour. After scooping out a cup of starter for my dough, I added a cup of flour and 3/4 water back into the starter, mixed it up, and let it sit out for about 6 hours before I put it back into the fridge. Use distilled or bottled water; tap water could be chlorinated and will kill your yeast friends.

I prepared the bread according to the recipe above, starting with the Astoria starter. The loaf came out of the oven a little weird looking: shiny, burnt in places, and lopsided. The latter is the fault of my oven, which, like my floor, slopes to the center of the room. Despite its suspicious looks, the bread smelled delicious. Like Parmesan cheese.

I really should have let the bread cool, but I was excited, and my roommate talked me into slicing it open. It was incredibly dense, and I deduced that I had not let it rise long enough.

We tasted it anyway: it was wonderful. Like a Parmesan cheese bread, that occasionally also tasted like baked macaroni and cheese. It was delicious. I could have eaten it all day. I was amazed. I had literally created this bread from nothing. How can so much flavor come from a mason jar full of flour and water on my windowsill? After having to throw away so many starters to get here, the whole thing just seemed like magic.

“I made this from the air,” I pointed out to my roommate. “You’re eating a piece of New York City. Literally.”

I put the Alaskan sourdough into the oven next; it rose slightly better, and the result was slightly less dense. But nowhere near as flavorful as the Astoria Sourdough. The New York bread was hands down our favorite.


Both loaves came out too dense. I don’t think I let either loaf of bread rise long enough: I hit closer to the 8 hour mark instead of 12. Bittman even recommends letting the dough rise for another 2 hours after you pull it out of the bowl and fold it over, which may be worth a try. Bittman also suggests cooking at 450 for 30 minutes with the lid on, the 15-30 minutes with the lid off. I am going to try his cooking temperature next time, to see if it prevents burnt bits.

The flavor of Sourdough bread varies by the region in which it is baked: sourdough was baked in San Francisco and Alaska because itinerant men needed to start their own yeast cultures; the sourdough from these regions became famous because of the particularly tasty local strains of yeast. New York yeast apparently tastes like mac and cheese.

I declare this experiment a success, although the technique will need to be tweaked. I will definitely be baking another loaf of delicious, cheesy, Astoria Sourdough. And I feel much closer to being able to survive on the frontier, just like so many other women had to do, long ago. Next week: I learn how to slaughter a buffalo.(just kidding)

(or maybe not…)

P.S.: For a little more science behind sourdough, here’s Alton Brown:


Retronovated Recipes: 400 Years of Apple Pie


I believe apple pie is one of the greatest pleasures of the fall, second only to all things pumpkin flavored. Over the weekend, I baked three apple pies from three different centuries: the 17th, 18th and 21st. In each recipe, the flavours are so distinctive, so apropos of their respective time periods, that I’ve felt an unrelenting urge to make them at once and let my palette travel back through time.

I baked these pies with the assistance of my mother. I hope that through our experiment, you find inspiration for your own fall pies.

To Make the Basic Pie


In preparing these pies, I decided to keep the method for making the pie consistent, and let the flavorings be the variable. This approach is historically accurate: most old recipes are only a list of ingredients; after years in kitchen, cooks would already know how to prepare something as simple as a pie.

Use the crust recipe of your choice, or get a store bought crust. For the filling, use a mixture of softer apples that will break down with cooking, and firmer apples that will keep their shape. I used a combination of Ginger Gold, Gala, and Paula Red apples, about three pounds in total.


To prepare the filling, I followed Pam Anderson’s recipe from her book, The Perfect Recipe.

“Apple Filling: …Heat butter (1/2 stick) in a large skillet over medium-high heat. Add apple slices, sugar and (spices) and when they start to sizzle and steam, reduce heat to low. Cover pan and simmer until apples soften and release their juices, about 8 minutes. Uncover, increase heat to medium-high and cook, stirring frequently, until softer apples start to fall apart and juices thicken to thin syrup consistency, about 5 minutes longer…Refrigerate of set in a cool place until apples cool to room temperature.”

After the filling is cooled, fill the crust, and don’t forger to cut vents in the top. Brush the top crust with a half and half mixture of cream and egg yolk to get a nice golden brown color in the oven. Bake it for 15 minutes at 375, then 20-30 minutes at 350. The pie is done when the filling begins to bubble up through the crust.

1615: Pippin Pie
The oldest recipe in my pie time machine is from The English Housewife, published in 1615. I came across it in the book 1,000 Years Over a Hot Stove in a chapter on colonial cooking.
The Modern Recipe: The original recipe uses whole apples, whole cloves, chunks of orange peel, and shattered bits of cinnamon stick. In the 17th century, grinding spices would have been a laborious process, and not economical for making an everyday dessert. I updated the recipe by using ground spices and orange zest, which make the pie easier to ingest, while still maintaining the original recipe’s unique flavor profile. I cooked the chopped dates in with the apples; they began to disintegrate and thicken the sauce. A coffin, by the way, is the pie pastry.

3 lbs apples
1/2 tsp clove
1/2 tsp cinnamon
Zest of one orange
1 -1 1/2 cups dates
1/3 c sugar


The Results: While the pie was baking, the combination of spices made the house smell like Christmas. But when it came time to eat, the orange and clove made the pie taste exactly like a pomander. I think if I were in the 17th century I would have loved it, but nowadays I hate eating potpourri. On the contrary, my friend Sarah Tea loved this pie. It was her favorite of the three.

1796: Apple Rosewater Pie
This recipe is from the first American cookbook, American Cookery by Amelia Simmons.

The Modern Recipe: Mace is an extremely zesty spice and can over power a dish in a large quantities. Conversely, I added a hearty dose of rosewater, which adds a bright, cirtusy flavor instead of a perfumee one. A recipe appropriate to the 19th century can be made by substituting cinnamon with nutmeg.
3 lbs apples
1 tsp lemon zest
1/2 tsp cinnamon
1/4 tsp mace
1 tsp rosewater
2/3 c sugar
The Results: My dad thought this pie tasted like Sara Lee, and this was my mother’s favorite. Despite it’s unconventional seasonings this pie tasted the most “normal.”
2006: Bob Evan’s Bourbon Apple Pie
This recipe comes from Amy Sedaris’ book “I Like You: Hospitality Under the Influence.” I won’t include the entire recipe here, due to copyright issues. My recipe was inspired by hers, but stuck to my own methods.
The Modern Recipe:
1/8 tsp cinnamon
1/8 tsp ginger
1/8 tsp nutmeg
2/3 cup sugar, divided.
1 cup bourbon.
Caramelize 1/3 cup sugar over a medium-low heat. When it is a little darker than the color of honey, remove from heat and slowly add the bourbon. Return to heat to dissolved the sugar, and reduce into “a thin sauce.” Stir into the apple pie filling after the filling has been cooked, but before it has cooled.
The Results: My mom loathed this pie and claimed “the taste was burning her tongue.” This pie was actually my favorite. The flavor seemed the most modern, and was the easiest for my pallet to accept. And I do love a glass of bourbon.
There you have it: Three pies. Three centuries. All apple pie in spirit, but all distinctly different.

The Sourdough Battle: After Three Days

After three days, the Alaskan Sourdough was ready to rock. It smelled sweet and yeasty. But I’m not really surprised, since the yeast culture is actually the result of the beer. Still, I’m looking forward to baking with it.What I’m really excited about is the New York Sourdough. As promised in the Science of Cooking Recipe, after three days the bread was dry on the outside, but inside it was bubbly with the arrival of transient yeasts making a home! And the best part? It does not smell like cat puke. It smelled “slightly sour,” the way it should.

Continuing to follow the recipe, I added 1/2 cup of flour and enough water to work it into a dough. I placed it back into the mason jar for another two days, and when I came back it was a blob of yeast bubbles.
And the best part? IT STILL DOES NOT SMELL LIKE CAT PUKE. It smells like a ripened cheese.
The only disheartening bit: after I pulled off the dried outside, there was a mysterious greyish spot in the center. I decided to continue the experiment, at a possible risk to my personal health. I added another cup of flour and a cup of water, and let it rise another twelve hours.
Mike, who comments here, made a very astute observation. He suggested that perhaps the reason bakeries keep the same starter for a hundred years is that is may be difficult to grow a starter that is appropriate for baking. Additionally, even the Science of Cooking notes “Working with starters takes practice. Many variables—for example, the amount of yeast in the air and the temperature of the room—will affect the fermentation process. It might take a few tries before you get the flavor you like.”
Both of the starters are ready for baking, but unfortunately I am leaving town for the weekend. I plan on baking two loaves of bread, one from each starter, when I return.
I feel as though I am one step closer to surviving on the Oregon Trail. Next, I’ll practice typing BANG really fast.
In the meantime, I’ll be baking apple pies with my mother in Ohio, using 17th, 18th, and 21st century recipes.

The First Stop for All You Historic Baking Needs

Eva forwarded me a link to an amazing site, Deborah’s Pantry. This site is seriously the go-to for all your hard to fine 18th and 19th century culinary needs.

Items I want particularly excited about:
Nutmegs with the mace still on it!! I have been trying to explain to people what this looks like for years.
Loaf Sugar: “Sugar was purchased in tall conical loaves. Pieces were cut from them with special sugar-cutting implements. Well-to-do households bought whole sugar loaves, but smaller quantities could be purchased from the apothecaries (originally sugar was treated as a spice), and later from apothecaries and grocers. Loaf sugar is suitable for use in cooking and baking without being clarified further (boiled to remove scum).”
Seeing these loafs was also great, because it answered my questions about how refined baking sugar was; the answer is very. These loaves are quite white. And the best part? She makes them herself:

“Sugar Loaves may not be available for immediate shipment: Deborah refines the sugar properly and makes the loaves herself using 18th-century techniques, and the curing process is very time-consuming.”

Deborah also carries two types of historic leavening, Saleratus, a 19th Century leavening; and Pearlash, appropriate for the 18th century. When I do my historic baking, I substitute Baking Powder with no adverse side affects, and will probably continue to do so. But it’s nice to know the real stuff is out there.

And she’s having a sale in August!

Deborah Peterson’s Pantry

Yeast Infection!

Left: The fresh starter. Right: After 48 hours.

I never updated you on my yeast experiments from last month.  Here’s the recipe I used to start my own yeast colony:

Except for some reason I didn’t boil it…I don’t know if I didn’t read the recipe close or what.  Here’s what I did:  I took a cup of flour and mixed it with 1/4 brown sugar, a pinch of salt, and a cup of water.  I let it sit out uncovered for 24 hours, the covered and let it sit another four hours.  Now despite the fact I didn’t follow the recipe, according to those in the know at Orwasher’s, this should still work.  After 48 hours, there were definitely some yeasty-looking bubbles.  But it also smelled horrible; Like cat puke.  I closed it up and hid it in the back of the fridge, where my roommates wouldn’t find it and ask “Lohman…What’s this?”

Needless to say, I haven’t tried to make anything from it. I’ve been too scared.  And that’s where it stands.

If you’re looking to try to make your own yeast, I also find many recipes, like this one, that use a combination of hops and potatoes.

Try This At Home: Make Yeast Appear–OUT OF THIN AIR!

This week has taken on a bit of a bread theme; I don’t have much experience with bread, but I’ve always been fascinated by it. It seems magical, the way the dough puffs and doubles in size. The smell of yeast dough rising has always been appealing to me.
But there was a question that had always bugged me. Before packets of commercial yeast, where did yeast come from? How did a woman living on the frontier in the 19th century make bread, the most basic and essential of items?
The other day I got the unique opportunity to hang out behind-the-scenes at Orwarsher’s Bakery, an upper east-side institution for the last 100 years. I had more fun with bread than I ever thought possible, and I also found time to ask them my burning question: where does yeast come from?
The answer? From thin air.
They told me: if you set out a bowl of water, flour, and sugar; yeast will come and live in it. That’s called your starter. Over time, you scoop out what yeast you need, and add sugar, flour, and water back in to “feed” it. In this fashion, a yeast colony can be kept indefinitely. In Orwasher’s case, their starter has been around since the bakery started over 100 years ago. So if you go into Orwasher’s today, you are eating bread made from the great-great-great-(etc) grandchildrens of yeast that was floating around in the New York air in 1900.
Kinda weird? A little, maybe. But also kinda awesome!
Additionally, Orwashers is reviving a very old (see: medieval) technique of bread making which involves building a yeast culture from grapes being fermented for wine. The resulting bread is dark and crusty, and looks like a loaf of bread out of a medieval banquet. They have several varieties available, and are great adorned with a smear of soft cheese or soaked in a bowl of hearty soup.
I’m giving yeast growing a try at home. I referenced an 1845 recipe for yeast, and I’ve set out a bowel of flour, brown sugar, warm water, and a little salt . I’ll keep you updated, and let you know what happens!

P.S.: I hung out at Orwarsher’s while doing a video for The Feedbag. See the video here.

Martha Washington’s Great Cake

In honor of our first president’s birthday, I wanted to share the recipe for Martha Washington’s infamous big-ass cake.

From the Mount Vernon website, Mrs. Washington’s Original Recipe:

“Take 40 eggs and divide the whites from the yolks and beat them to a froth. Then work 4 pounds of butter to a cream and put the whites of eggs to it a Spoon full at a time till it is well work’d. Then put 4 pounds of sugar finely powdered to it in the same manner then put in the Yolks of eggs and 5 pounds of flour and 5 pounds of fruit. 2 hours will bake it. Add to it half an ounce of mace and nutmeg half a pint of wine and some fresh brandy.

Notes on making Martha Washington’s Great Cake:

In making the great cake, Mount Vernon’s curatorial staff followed Mrs. Washington’s recipe almost exactly. Where the recipe called for 5 pounds of fruit, without specifying which ones, 2 pounds of raisins, 1 pound of currants, and 2 pounds of apples were used. The wine used was cream sherry. Since no pan large enough was available to hold all the batter, two 14 layers were made and stacked (note: the original was one single tall layer). The layers were baked in a 350 degree oven for 1.5 hours. Should be iced with a very stiff egg-white based icing, flavored with rosewater or orange-flower water.”

And in the spirit of the Month of Presidents, and the ongoing celebration of Lincoln’s 200th birthday, Dj Bryan sent me this post on What about the plastic animals? about Mary Todd Lincoln’s White Almond Cake:

“The Lincoln Home National Historic Site has the recipe, which I assumed was authentic. It turned out well. The recipe called for six whipped egg whites to be folded into the batter. That made the cake fairly light, but still denser than an angel food cake…

Another recipe still has me scratching my head. And I quote: ‘Because I love a challenge, I took this recipe home and made Mary Todd Lincoln’s cake. Even with today’s modern technology, the process was slow going. In all, it took about four hours to cream the butter, whip the egg whites, chop the almonds and get it all mixed and baked. I used a mixer and a mini chopper…’

Four hours? Discount the baking time and there’s still three hours left. What task could have possibly taken three hours? I don’t mean to brag but it took me all of 15-20 minutes using an electric hand mixer, a mini food processor, and a large wooden spoon. Did she shell, peel and blanch the almonds? Were the almonds chopped one at a time? Did she forget to mention that she has no arms? I am baffled.”

Me too. Happy Birthday, Presidents!

Apple Rosewater Tart

Ever been curious about the image at the top of this blog? It’s an apple-rosewater tart, a recipe that originally debuted during my thesis project. I recently received an email from one of my college professors that got me thinking about this recipe again. He said:
“I can’t seem to make an apple pie any more without using your Riesling wine and rosewater recipe. Actually, sometimes I use orangeblossom water, a suggestion of the Arabic grocery store where I get the rosewater.”
It tastes divine.
***
Apple Rosewater Tart
Based on American Cookery (1796) by Amelia Simmons
2 1/2 lbs. Apples,
2 tablespoon Rosewater
1 tsp. Cinnamon
2/3 cup Sugar
2/3 cup Riesling white wine
1 tbls. orange juice
1 tablespoon + 1tsp cornstarch

Crust recipe of your choice
1. Prepare crust
2. Slice apples and mix with sugar, cinnamon, orange juice and rosewater.
3. Melt butter in a large skillet. Add apples, wine and cornstarch. Saute until apples begin to sizzle, then about five minutes more. They will be just tender, but still fairly firm. Let cool.
4. Line tart pans with crust. Pour filling into crust.
5. Bake in an oven at 400 until crust edges are golden brown.

History Dish Mondays: Cider Cake

I’m launching a new feature: Each week, I’m going to test a historic recipe. Check in on Mondays to see the results.

This week, Cider Cake. It is fast and easy to mix up and a delicious snack or breakfast. The ingredients are simple, so prep is a breeze.

Cider Cake
Original recipe from The Frugal Housewife by Lydia Maria Child; modern recipe is adapted from The Old Sturbridge Village cookbook.

1/2 cup unsalted butter
1/2 cup sugar (refined, unrefined or maple. I used regular white shug)
2 eggs
3 cups flour
1 tsp baking powder
1/4 tsp nutmeg
1 tsp cinnamon
1 cup apple cider

Preheat oven to 350. Sift flour, baking powder, and spices; set aside. Cream butter and sugar. Add eggs and mix well. Add flour mixture and cider alternately, starting and ending with the flour. Scrape bowl and mix until combined. Pour into a loaf pan and sprinkle top with sugar. Bake 50-55 minutes.

***

Although I used fresh apple cider, this recipe can also be made with hard cider. It’s actually more historically accurate; I think I’ll try it sometime in the near future, I’m curious how it alters the taste. Additionally, Childs says to “spice to your taste.” For the era that this recipe is from, that would usually mean some combination of nutmeg, ginger, and possibly mace. I used cinnamon, not popular in the first half of the 19th century, because I like it best.

When I mixed up the cake and I added the cider, the batter really blossomed with a delicious apple-y smell. I put it into a loaf pan and sprinkled the top with some sugar to give it a nice, sweet, crust. I baked about 50 minutes in a 350 oven, and turned it halfway through.
The cake came out lighter in color than I expected; the level of sweetness and texture reminded me very much of a zucchini or banana bread. I think this recipe could be made even more delicious with the addition of some sliced apples or nuts.

Rating: A
I would make this again.

New York, New Year Cakes

My friend over at New York, Circa 1850 has made some rather pretty New York Cakes, which are traditionally served to New Year’s Day callers.

Here’s what she has to say about the finished product:
“The flavors (nutmeg, cinnamon, rosewater, and caraway seeds) are a bit jarring to the modern palate and the cakes are barely sweet; it has taken me a day or so to find them rather pleasant after all.”